스크롤뷰(UIScrollView)를 스토리보드 없이 만들어보겠습니다.
제가 스토리보드를 사용하지 않고 코드를 사용하여 그리는 이유는 Github와 같은 버전관리 툴을 사용할때 코드를 통해 뷰의 변경점을 관리하기 위해 입니다. 스토리보드를 사용하여 버전관리를 진행한다면 뷰를 변경했을때 어떤 부분이 변경했는지 명확하게 보이지 않기 때문에 코드를 통해 뷰를 그려나가고 있습니다. 해당 포스트에서는 AutoLayout을 사용하고 Snapkit을 사용합니다.
UIScrollView 주의사항
코드를 사용해 스크롤뷰를 그릴 때 주의사항이 있습니다. 주의사항은 Apple Document에 있는 UIScrollView 설명에 적혀있습니다.
UIScrollView - UIKit | Apple Developer Documentation
The methods declared by the UIScrollViewDelegate protocol allow the adopting delegate to respond to messages from the UIScrollView class and thus respond to, and in some affect, operations such as scrolling, zooming, deceleration of scrolled content, and s
developer.apple.com
The central notion of a UIScrollView object (or, simply, a scroll view) is that it is a view whose origin is adjustable over the content view. It clips the content to its frame, which generally (but not necessarily) coincides with that of the application’s main window. A scroll view tracks the movements of fingers and adjusts the origin accordingly. The view that is showing its content “through” the scroll view draws that portion of itself based on the new origin, which is pinned to an offset in the content view. The scroll view itself does no drawing except for displaying vertical and horizontal scroll indicators. The scroll view must know the size of the content view so it knows when to stop scrolling; by default, it “bounces” back when scrolling exceeds the bounds of the content.
반드시 스크롤뷰 내부에 있는 컨텐츠 사이즈를 알아야한다!! 라고 합니다. 때문에 두가지 조건을 만족시키도록 코드를 작성해야합니다.
1. 스크롤뷰 내부에 컨텐츠를 담고있는 컨텐츠뷰가 존재해야한다.
2. 컨텐츠뷰의 사이즈를 명확하게 해야한다.
이 두가지 조건을 기억하고 있어야합니다.
뷰그리기
// ScrollView.swift
import UIKit
import SnapKit

class ScrollView: UIView {
    let scrollView = UIScrollView()

    ///////////// 1번째
    let contentsView = UIView()
    //////////////////////////

    let imageView1: UIImageView = {
        let imageView = UIImageView()

        imageView.contentMode = .scaleAspectFit
        imageView.image = UIImage.init(named: "img_spongebob")
        return imageView
    }()

    let imageView2: UIImageView = {
        let imageView = UIImageView()

        imageView.contentMode = .scaleAspectFit
        imageView.image = UIImage.init(named: "img_spongebob")
        return imageView
    }()

    let imageView3: UIImageView = {
        let imageView = UIImageView()

        imageView.contentMode = .scaleAspectFit
        imageView.image = UIImage.init(named: "img_spongebob")
        return imageView
    }()

    let imageView4: UIImageView = {
        let imageView = UIImageView()

        imageView.contentMode = .scaleAspectFit
        imageView.image = UIImage.init(named: "img_spongebob")
        return imageView
    }()


    required init?(coder: NSCoder) {
        super.init(coder: coder)
    }

    override init(frame: CGRect) {
        super .init(frame: frame)

        backgroundColor = .black
        ///////////// 2번째
        contentsView.addSubview(imageView1)
        contentsView.addSubview(imageView2)
        contentsView.addSubview(imageView3)
        contentsView.addSubview(imageView4)
        scrollView.addSubview(contentsView)
        addSubview(scrollView)


        scrollView.snp.makeConstraints { (make) in
            make.edges.equalTo(0)
        }

        imageView1.snp.makeConstraints { (make) in
            make.centerX.equalToSuperview()
            make.top.equalToSuperview()
            make.width.equalToSuperview()
            make.height.equalTo(imageView1.image!.size.height * frame.width / imageView1.image!.size.width)
        }

        imageView2.snp.makeConstraints { (make) in
            make.centerX.equalToSuperview()
            make.top.equalTo(imageView1.snp.bottom).offset(10)
            make.width.equalToSuperview()
            make.height.equalTo(imageView1.image!.size.height * frame.width / imageView1.image!.size.width)
        }

        imageView3.snp.makeConstraints { (make) in
            make.centerX.equalToSuperview()
            make.top.equalTo(imageView2.snp.bottom).offset(10)
            make.width.equalToSuperview()
            make.height.equalTo(imageView1.image!.size.height * frame.width / imageView1.image!.size.width)
        }

        imageView4.snp.makeConstraints { (make) in
            make.centerX.equalToSuperview()
            make.top.equalTo(imageView3.snp.bottom).offset(10)
            make.width.equalToSuperview()
            make.height.equalTo(imageView1.image!.size.height * frame.width / imageView1.image!.size.width)
        }

        ///////////// 3번째
        contentsView.snp.makeConstraints { (make) in
            make.edges.equalTo(0)
            make.width.equalTo(frame.width)
            make.height.equalTo(frame.height + 100)
        }
    }
}
똑같은 스폰지밥 이미지를 4개 불러와서 화면의 상단부터 하단 방향으로 10만큼 띄어서 연결한 화면입니다.
여기서 스크롤 뷰를 그릴 때 중요하게 봐야하는 부분은 3가지 부분입니다. (코드에도 주석처리로 적어놓았습니다.)
1. 컨텐츠뷰 생성 (Contents View)
let contentsView = UIView()스크롤 뷰 안에 컨텐츠 들이 들어가는 컨텐츠뷰를 하나 생성하였습니다. 애플 공식 문서에서도 정의되어있듯이 스크롤뷰 안에는 스크롤 되는 컨텐츠뷰가 존재해야 스크롤 뷰가 정상적으로 동작합니다. 따라서 컨텐츠 뷰라는 이름을 가진 UIView객체를 하나 생성하였습니다. 스크롤 되는 모든 컴포넌트들은 모두 여기의 자식뷰로 들어갈 예정입니다.
2. 컨텐츠뷰의 자식으로 스크롤되는 컴포넌트 넣기
override init(frame: CGRect) {
super .init(frame: frame)
backgroundColor = .black
containerView.addSubview(imageView1)
containerView.addSubview(imageView2)
containerView.addSubview(imageView3)
containerView.addSubview(imageView4)
scrollView.addSubview(containerView)
addSubview(scrollView)
...
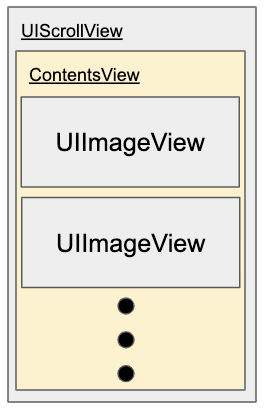
}스크롤 뷰를 정상적으로 동작시키기 위해선 위와같은 계층 구조를 구성해야합니다. 스크롤뷰 안에 스크롤 되는 컨텐츠뷰가 존재하고 컨텐츠뷰 안에 스크롤에 따라 나타나는 컴포넌트들이 존재해야합니다. 따라서 위에서 생성한 4개의 이미지 뷰를 컨텐츠 뷰의 자식으로 넣고 컨텐츠 뷰를 스크롤뷰의 자식으로, 스크롤뷰를 최상위 뷰의 자식으로 넣었습니다. 그림으로 표현하면 아래와 같은 계층을 구성해야 합니다.
3. 컨텐츠 뷰 위치와 사이즈 설정
override init(frame: CGRect) {
        super .init(frame: frame)

        ...

        containerView.snp.makeConstraints { (make) in
            make.edges.equalTo(0)
            make.width.equalTo(frame.width)
make.height.equalTo((imageView1.image!.size.height * frame.width / imageView1.image!.size.width) * 4 + 30)
        }
    }
스크롤뷰 내부에 있는 컨텐츠 뷰의 사이즈가 명확해야 스크롤뷰가 얼마나 스크롤되야하는지 알 수 있다고 애플 공식 문서에 적혀있으니 컨텐츠 뷰의 사이즈를 정확하게 설정해줘야합니다. 저는 정확하게 마지막 이미지가 끝나는 시점까지만 스크롤 되도록 설정하기 위하여 이미지 4개의 높이와 여백으로 설정한 30pt 만큼을 컨텐츠 뷰의 높이로 설정하였습니다. 당연히 세로로 스크롤이 되야하므로 가로폭 길이는 스크린 폭과 동일하게 설정하였습니다. 만약 컨텐츠뷰의 포지션이 설정되어 있지 않거나 가로 세로 길이가 설정되어있지 않다면 어색한 화면으로 보이거나 스크롤이 되지 않습니다. 컴파일시점이나 런타임에서 에러가 발생하지 않고 Warning만 뜨기 때문에 경고만 보고 처리해야 합니다.
'iOS' 카테고리의 다른 글
| [iOS/Swift5] 스토리보드 없이 횡스크롤 UICollectionView 만들기 (0) | 2020.02.08 |
|---|---|
| [iOS/Swift] 선택된 셀이 표시되는 UICollectionView (0) | 2020.02.08 |
| [iOS13] 스토리보드 없이 프로젝트 시작하기 (0) | 2020.01.26 |
| 아이폰 다양한 해상도 비율에 맞게 AutoLayout 그리기(with SnapKit) (0) | 2020.01.14 |
| [RxSwift, RxCocoa] bind와 subscirbe의 차이점 (0) | 2020.01.07 |


